Halloween is approaching, and Queen Creek residents are preparing for a season of spooky fun. For those who wish to add a personal touch to their holiday decorations, creating them yourself offers a great way to make a unique and noticeable display without spending a lot. These craft projects are not only economical but also allow for significant creativity, turning common household items into frightening decorations. From creepy cobwebs that hang over your porch to personalized grave markers in your yard, there’s a do-it-yourself project for every skill level and taste.
Making your own Halloween decorations is a great way to involve the entire family in the holiday spirit and create lasting memories. It’s also a good chance to make your home’s appearance distinctive, whether you are aiming for pleasantly spooky or delightfully scary. These projects are designed to be easy to do, using standard materials that can be easily found at local craft stores or even around your house. Get ready to make your Queen Creek home the most talked-about place on the block with these imaginative and simple Halloween decoration ideas that promise a big effect with little effort.
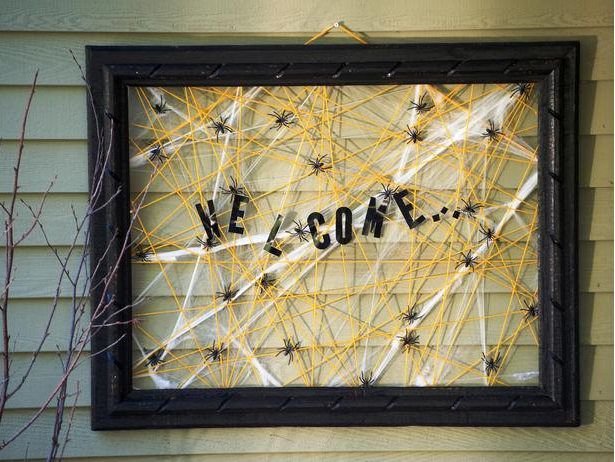
- A spooky porch detail that inspires a DIY welcome sign with webs and spiders. Source: arizonafoothillsmagazine.com
First, let’s create a striking front porch sign that establishes the mood for your Halloween atmosphere. You will need a used or old picture frame, which you can paint black for a traditional spooky look. Hammer small wire nails along the back edge, making sure about a quarter-inch sticks out. These nails will be the points to attach a web of yellow or orange yarn, wrapped back and forth randomly. Behind the yarn, stretch white cotton spider webbing, also attached to the nails.
Once the yarn and webbing are in place, you can add your own message by attaching black letters to spell out “Happy Halloween” or a more unsettling “Enter If You Dare.” For the final frightening touch, place small toy spiders among the yarn and webbing, making it appear as though your porch is overrun by spiders. Remember to add felt pads to the back corners of the frame to stop the nails from scratching your home’s exterior. This homemade sign is an excellent way to greet trick-or-treaters with a personalized dose of Halloween spirit.
Making creepy spiderwebs from cheesecloth is another straightforward yet very effective method to add Halloween spirit to your Queen Creek home. This adaptable decoration can be used to cover doorways, create a frightening hallway, or even add a spooky detail to your dining room table arrangement. Begin by measuring the area where you want to hang the webs and cut the white or ivory cheesecloth to size. Secure the fabric using pushpins or adhesive hooks, letting it hang loosely.
To achieve a torn, spooky appearance, carefully cut vertical strips from the cheesecloth, varying their lengths and spacing. Gently snip and tear small holes throughout the fabric, then rub the cheesecloth between your hands to fray the edges, giving it that realistic, old cobweb look. Finally, attach plastic spiders to your handmade webs using a little white craft glue, scattering them thoughtfully for maximum creepiness. These homemade webs are an economical way to create a dramatic and unsettling atmosphere for your Halloween display.
Turn your front yard into a frightening graveyard with homemade grave markers, a guaranteed way to impress neighbors and trick-or-treaters. This project uses gray paper bags, which are surprisingly good for creating a worn stone appearance. Print out the grave marker and inscription templates; you can find many online for free. Cut the top of the paper bags to resemble the uneven shape of a real grave marker. For the inscriptions, use the template to cut out letters, making a stencil.
Place the inscription stencil onto the cut bag and use a sponge with black craft paint to dab the letters on, creating a stenciled look. Let the paint dry completely. To stabilize your grave markers, insert a piece of cardboard at the bottom of each bag. You can then push garden stakes through the bottom of the bags into the ground to hold them in place. For an extra spooky effect, place LED tea lights inside each grave marker, about three per bag, for an eerie light that illuminates your graveyard at night.
For a touch of festive style that is still perfectly spooky, consider a sparkling pumpkin centerpiece. This project uses artificial pumpkins that can be reused each year. Start by painting your pumpkins black. Once dry, apply tacky glue to half of each pumpkin using a paintbrush. Place the glued portion over a bowl filled with very fine black and silver glitter. Spoon the glitter over the glued surface, making sure it sticks to all areas, and let excess fall back into the bowl. Place the glittered pumpkin on a tray to dry for at least an hour.
After the first half is dry, gently tap off any extra glitter. Repeat the gluing and glittering process on the remaining unglittered portion of each pumpkin until they are completely covered. You can touch up any bare spots if needed. Arrange these dazzling pumpkins on a tiered cake stand, perhaps adding some dark candlesticks, black candles draped with your homemade cheesecloth spiderwebs, and a few artificial spiders or ‘Dusty Miller’ plants for a hauntingly beautiful and custom centerpiece that will be the main topic of conversation at your Queen Creek Halloween event.
Stay informed about events in Queen Creek by signing up for our newsletter!
Header Image Source: AI-generated image